Strengthening Linux Security: AI-Powered Threat Detection and Self-Healing Systems
Welcome to my Linux Series! This is PART 1, where we’ll dive into the future of Linux security — powered by AI.
Now imagine a world where your Linux systems can detect threats in real-time, heal themselves automatically after a breach, and continuously harden their defenses against evolving cyber threats. Wouldn’t it be amazing?
This blog will take you through the cutting-edge integration of AI into Linux security, turning your systems into autonomous guardians with real-time threat detection, self-healing automation, and dynamic system hardening.
So let’s explore how AI is revolutionizing the landscape of DevSecOps, one secure system at a time.
Why AI-Augmented Security?
Traditional security approaches rely heavily on predefined rules and manual intervention, which can’t always keep up with rapidly evolving threats. AI-driven security combines pattern recognition, anomaly detection, and automation to provide proactive defenses that adapt over time.
This architecture leverages open-source tools like Falco, Elastic Stack, CrowdSec, Ansible, Jenkins, Wazuh, Osquery, and OpenSCAP. These tools, when integrated properly, offer a comprehensive solution for securing your Linux systems.
Real-World Use Case: Protecting a Critical Web Server
Imagine you are managing a critical web server hosting confidential customer data. You must ensure this server is resilient to insider threats, file system tampering, and external attacks while maintaining compliance with security best practices.
By implementing the AI-Augmented Linux Security architecture, you can achieve:
Real-Time Threat Detection: Catch attacks as they happen, without relying solely on traditional signatures.
Self-Healing: Automatically restore critical services when a failure or compromise is detected.
Continuous Hardening: Ensure your system stays compliant with security standards like CIS benchmarks through automated audits and remediation.
Key Areas of AI-Augmented Linux Security
1. AI-Powered Kernel and System Monitoring
AI systems continuously monitor the Linux kernel and processes, analyzing every system call, modification, or process escalation. This real-time monitoring detects threats such as rootkits, privilege escalations, and unauthorized modifications at the kernel level. AI can swiftly isolate these components or rollback the system to its secure state before any damage is done.
Example: By leveraging AI-powered tools like Falco for real-time kernel monitoring, you can detect suspicious kernel-level activities like loading unauthorized modules or privilege escalations. With AI, the system recognizes abnormal behavior patterns and prevents rootkit installation before it compromises the kernel.
2. Self-Healing Automation
AI drives the concept of self-healing within Linux systems by automating the recovery process after security breaches. Upon detecting a threat, AI triggers remediation workflows that autonomously restore compromised components to a pre-defined secure state, avoiding human intervention.
Example: When a malware infection is detected, AI tools like Ansible can immediately quarantine the infected process, restart the compromised service, and restore the system from the latest clean backup. This reduces downtime and ensures business continuity.
3. AI-Driven Linux Firewall and Network Security Automation
AI integrates with firewall policies to analyze network traffic in real-time, identify suspicious traffic, and adjust firewall rules to block malicious IP addresses dynamically. By feeding threat intelligence into AI, the firewall continuously evolves, adapting to new attack vectors.
Example: AI-based tools like CrowdSec continuously monitor incoming traffic for anomalies. When a DDoS attempt is detected, the system adjusts the firewall rules in real-time to block traffic from the malicious source without requiring human oversight.
4. File Integrity Monitoring and Malware Detection
AI can detect unauthorized file changes by analyzing patterns and comparing them to baseline behavior. For malware detection, AI uses deep learning models to identify malware signatures and behavior. Once malware is detected, AI triggers automatic rollback and system restoration to mitigate the attack.
Example: AI-driven file integrity monitoring solutions like Wazuh track unauthorized changes to critical files (e.g., /etc/passwd). If an anomaly is detected, AI reverts the file to its secure baseline state and flags the incident for further analysis.
5. Anomaly Detection and Insider Threat Prevention
AI leverages behavioral analysis to detect insider threats, unauthorized access, or abnormal user activity. It continuously learns user patterns and flags any deviation from the norm, immediately isolating the suspicious session or user.
Example: By employing AI-based tools like Osquery, you can monitor user behavior and detect unusual activities, such as an employee accessing sensitive files outside working hours. The AI system flags and blocks unauthorized actions, preventing potential insider threats.
6. System Hardening and Baseline Management
AI ensures continuous system hardening by enforcing security policies aligned with industry standards such as CIS and NIST. AI-driven monitoring automatically identifies deviations from the baseline configuration and remediates them in real-time.
Example: Using tools like OpenSCAP, AI monitors system configurations and ensures compliance with CIS benchmarks. Any deviation from the hardened state triggers an automatic rollback to a secure configuration, ensuring the system is always hardened.
Architecture Overview
First Sequence diagram
Focuses on real-time system monitoring, anomaly detection, automated remediation, and integration with security tools like SIEM, CrowdSec, and Jenkins.
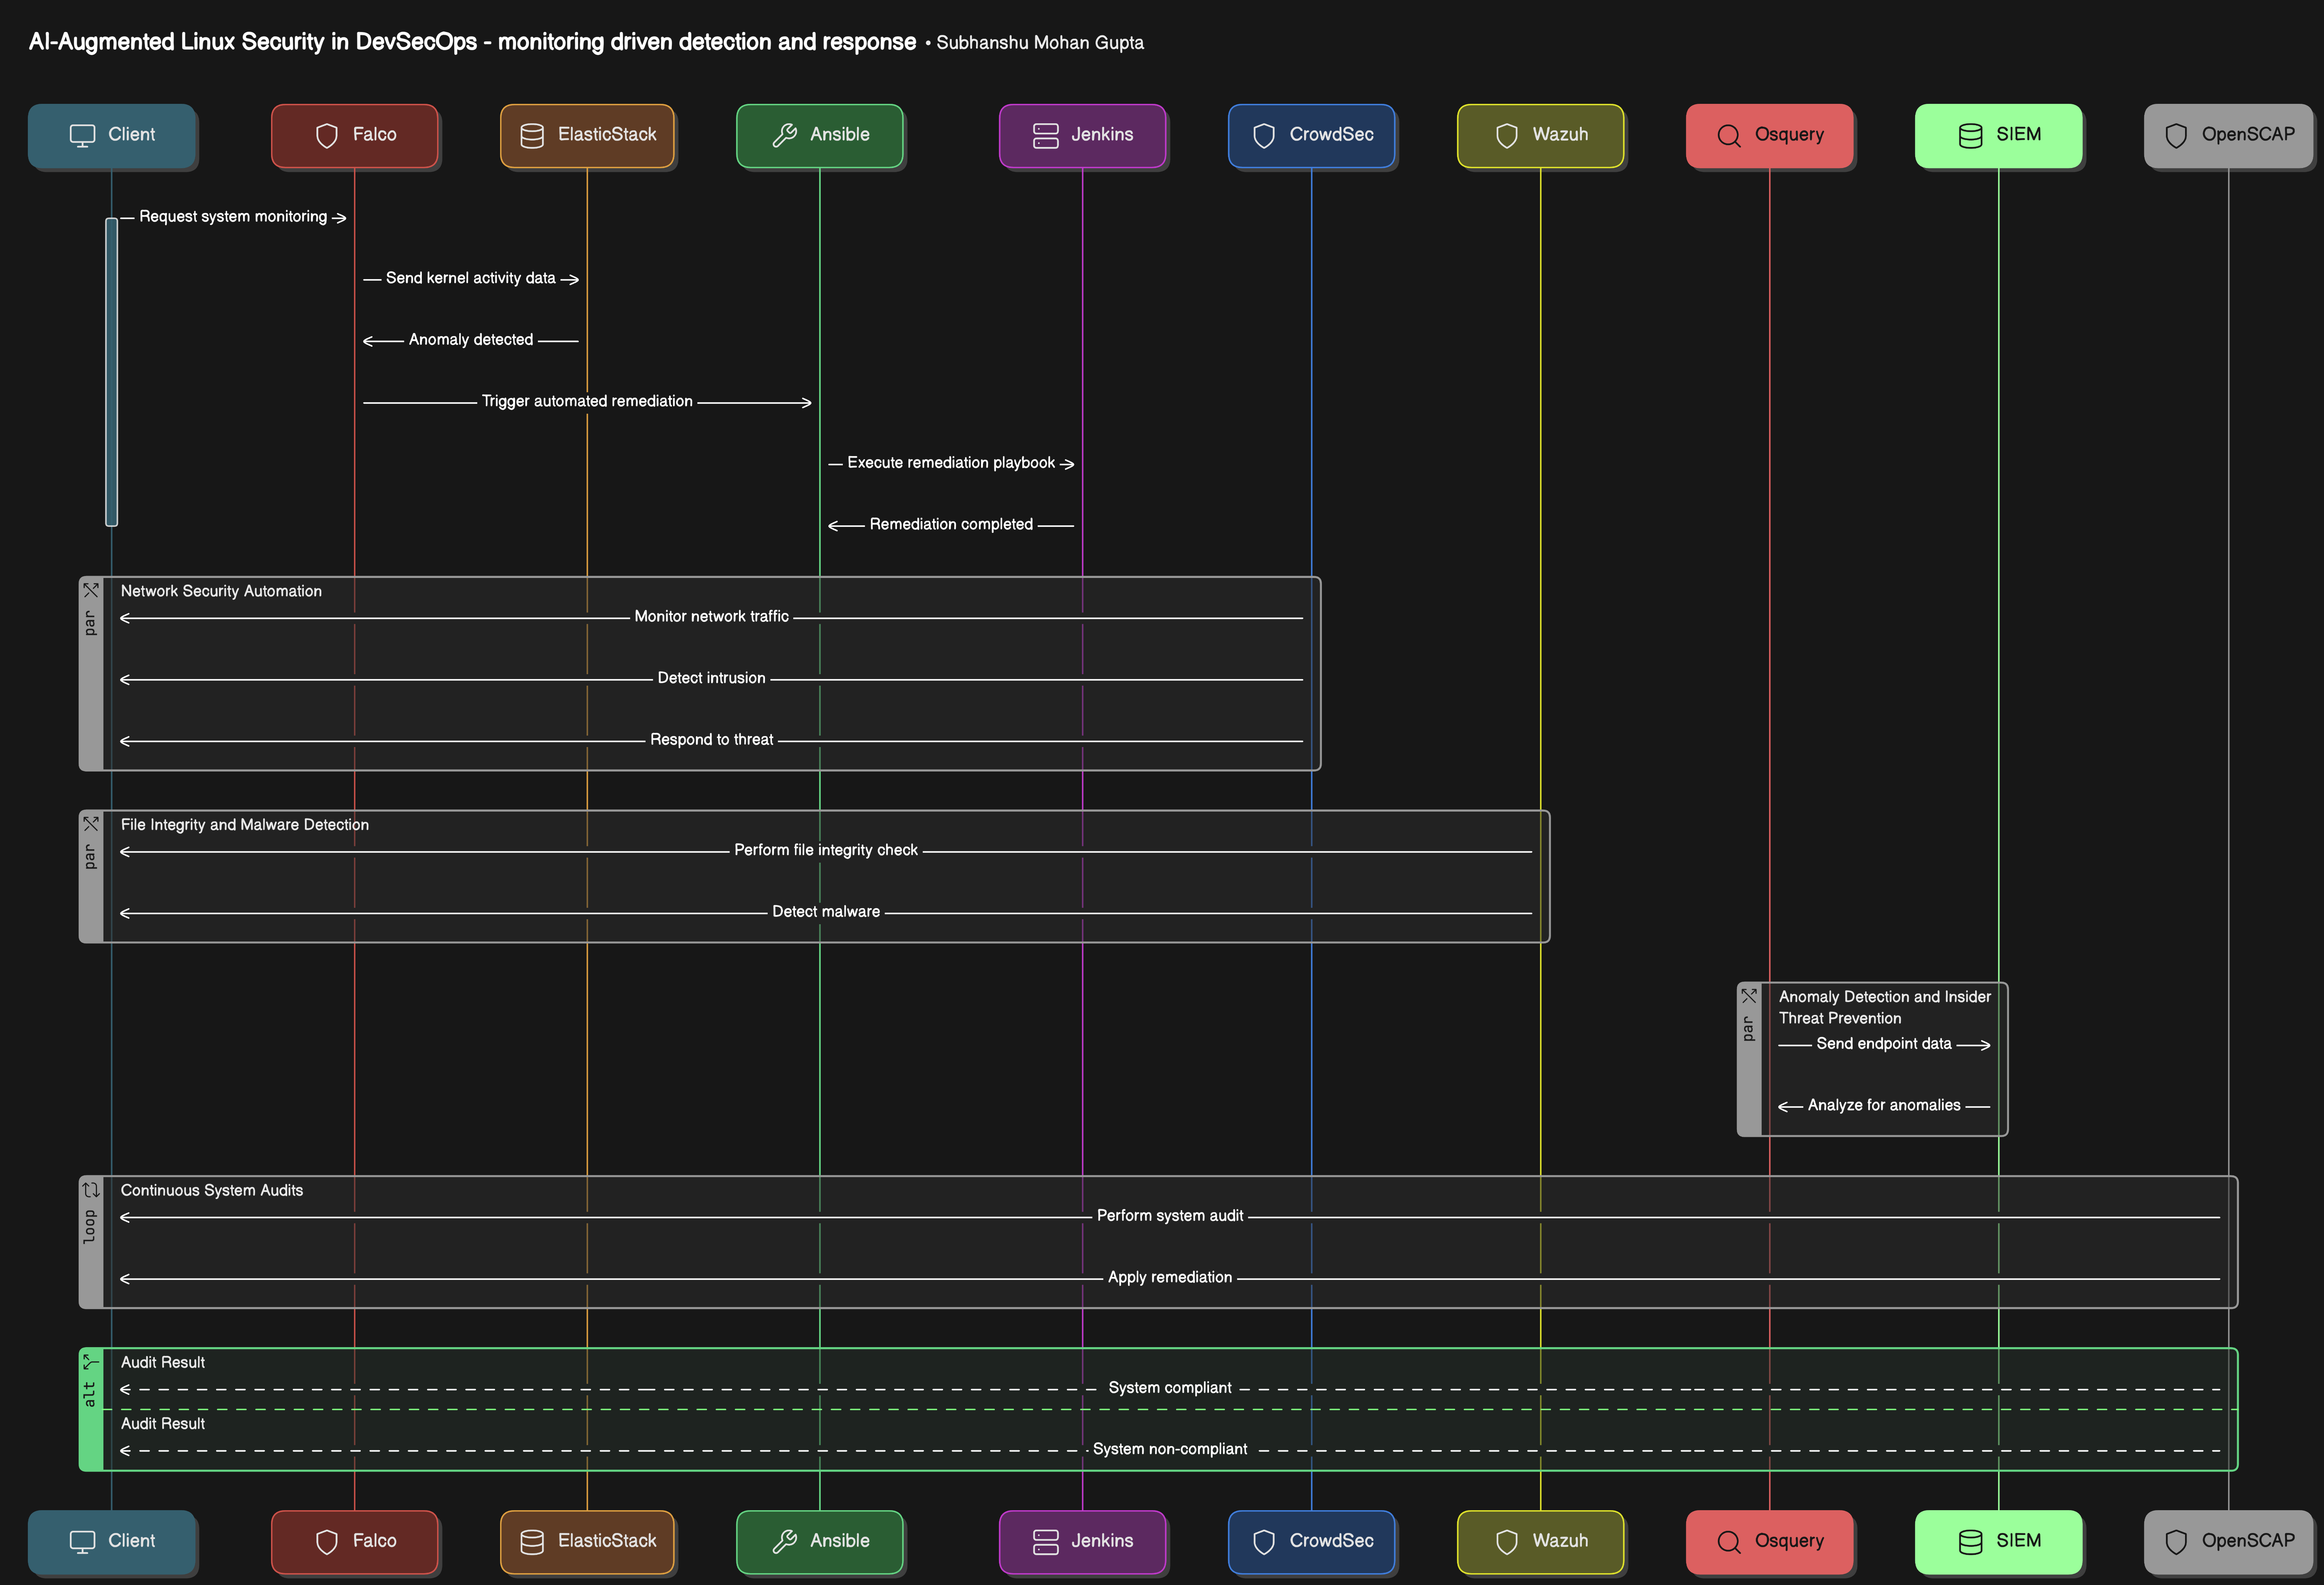
Second sequence diagram
Highlights network security automation, firewall rule application, file integrity checking, malware detection, and endpoint monitoring.
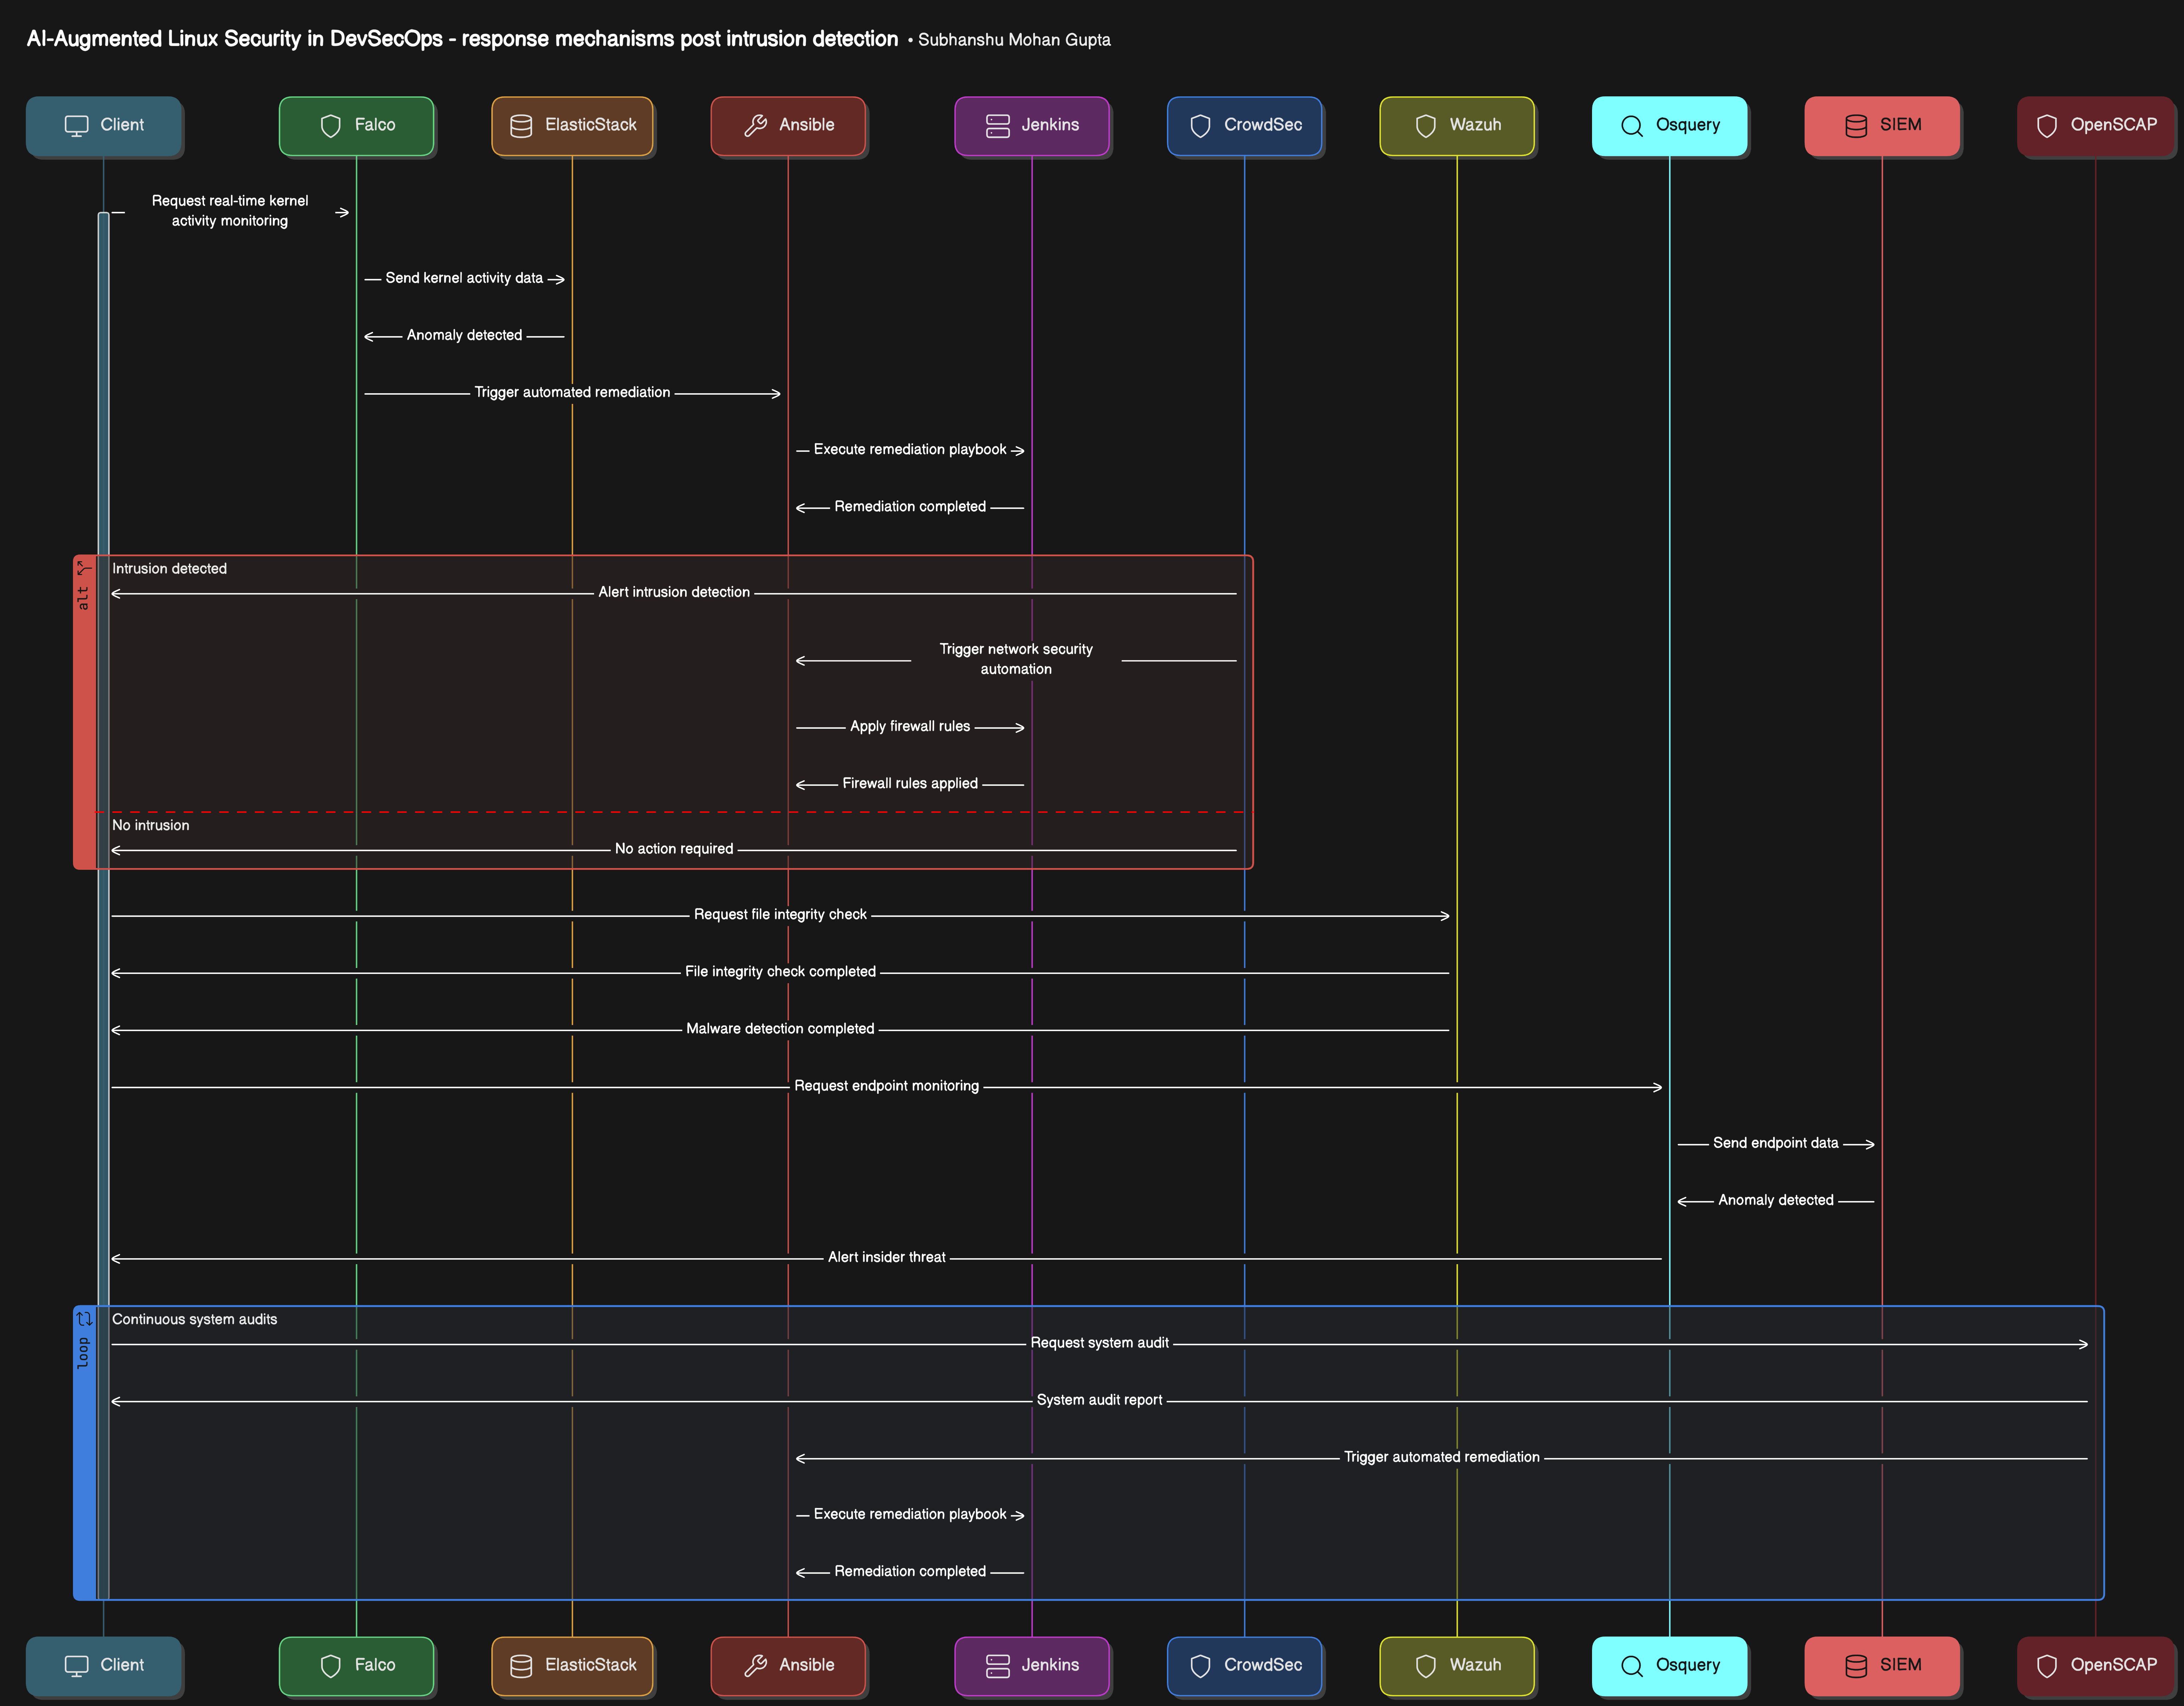
Components
AI-Powered Kernel and System Monitoring: Falco for real-time kernel activity monitoring, integrated with Elastic Stack for anomaly detection.
Self-Healing Automation: Ansible for automated remediation, triggered by security events monitored through Jenkins.
AI-Driven Firewall and Network Security Automation: CrowdSec for community-powered, AI-driven intrusion detection and response.
File Integrity Monitoring and Malware Detection: Wazuh for comprehensive file integrity checks and malware detection.
Anomaly Detection and Insider Threat Prevention: Osquery for real-time endpoint monitoring, integrated with a SIEM solution.
System Hardening and Baseline Management: OpenSCAP for continuous system audits and automated remediation.
Step-by-Step Implementation Guide
1. AI-Powered Kernel and System Monitoring
1.1 Install Falco
Falco is a cloud-native runtime security tool that can monitor kernel activities.
# Update system
sudo apt-get update

# Install prerequisites
sudo apt-get -y install apt-transport-https ca-certificates curl gnupg

# Add Falco GPG key
curl -fsSL https://falco.org/repo/falcosecurity-packages.asc | sudo apt-key add -

# Add Falco repository
echo "deb https://download.falco.org/packages/deb stable main" | sudo tee /etc/apt/sources.list.d/falcosecurity.list

# Install Falco
sudo apt-get update
sudo apt-get install -y falco
1.2 Configure Falco
Edit the Falco configuration file to set up alert outputs.
sudo nano /etc/falco/falco.yaml
Enable program outputs:
program_output:
  enabled: true
  keep_alive: false
  program: /usr/bin/falco_alert.sh
Create the alert script /usr/bin/falco_alert.sh:
sudo nano /usr/bin/falco_alert.sh
Add the following content:
#!/bin/bash
echo "$1" | /usr/bin/logger -t falco
Make the script executable:
sudo chmod +x /usr/bin/falco_alert.sh
1.3 Integrate with Elastic Stack
Install Filebeat to ship logs to Elasticsearch for AI-driven anomaly detection.
# Download and install Filebeat
curl -L -O https://artifacts.elastic.co/downloads/beats/filebeat/filebeat-7.10.0-amd64.deb
sudo dpkg -i filebeat-7.10.0-amd64.deb
Configure Filebeat to monitor Falco logs:
sudo nano /etc/filebeat/filebeat.yml
Add the following to the filebeat.inputs section:
- type: log
  paths:
    - /var/log/syslog
  include_lines: ['falco']
Set the output to Elasticsearch:
output.elasticsearch:
  hosts: ["localhost:9200"]
Start Filebeat:
sudo systemctl enable filebeat
sudo systemctl start filebeat
1.4 Install and Configure Elastic Stack
Follow the official guide to install Elasticsearch, Kibana, and Logstash.
Set up machine learning jobs in Kibana to analyze Falco logs for anomalies.
2. Self-Healing Automation
2.1 Install Ansible
sudo apt-get update
sudo apt-get install -y ansible
2.2 Write Ansible Playbooks
Create a playbook to restore services:
sudo mkdir /etc/ansible/playbooks
sudo nano /etc/ansible/playbooks/self_heal.yml
Example playbook:
---
- hosts: localhost
  become: true
  tasks:
    - name: Restart compromised service
      service:
        name: nginx
        state: restarted

    - name: Restore configuration files
      copy:
        src: /backup/nginx.conf
        dest: /etc/nginx/nginx.conf
        owner: root
        group: root
        mode: '0644'
2.3 Automate with Jenkins
Install Jenkins:
wget -q -O - https://pkg.jenkins.io/debian-stable/jenkins.io.key | sudo apt-key add -

sudo sh -c 'echo deb https://pkg.jenkins.io/debian-stable binary/ > \
    /etc/apt/sources.list.d/jenkins.list'

sudo apt-get update
sudo apt-get install -y openjdk-11-jdk jenkins
Configure Jenkins to run Ansible playbooks when a Falco alert is received.
Note: Set up a webhook or use Jenkins' API to trigger the job.
3. AI-Driven Firewall and Network Security Automation
3.1 Install CrowdSec
curl -s https://packagecloud.io/install/repositories/crowdsec/crowdsec/script.deb.sh | sudo bash

sudo apt-get install -y crowdsec
3.2 Configure CrowdSec
Install the firewall bouncer:
sudo apt-get install -y crowdsec-firewall-bouncer-iptables
The firewall bouncer will automatically block IPs identified as malicious.
3.3 Feed Threat Intelligence
CrowdSec leverages community-shared threat intelligence. Ensure your server is sharing and receiving the latest threat data.
4. File Integrity Monitoring and Malware Detection
4.1 Install Wazuh
Set up the Wazuh server by following the official installation guide.
4.2 Install Wazuh Agent
On your Linux server:
curl -so wazuh-agent-4.2.5.deb https://packages.wazuh.com/4.x/deb/pool/main/w/wazuh-agent/wazuh-agent_4.2.5-1_amd64.deb
sudo dpkg -i wazuh-agent-4.2.5.deb
4.3 Configure Wazuh Agent
Edit the agent configuration to point to your Wazuh server:
sudo nano /var/ossec/etc/ossec.conf
Set the <server> element to your Wazuh server's IP address.
Start the agent:
sudo systemctl enable wazuh-agent
sudo systemctl start wazuh-agent
4.4 Set Up File Integrity Monitoring
In Wazuh manager, configure FIM to monitor critical files:
<syscheck>
  <directories check_all="yes">/etc,/bin,/sbin,/usr/bin,/usr/sbin</directories>
</syscheck>
4.5 Automate Rollback
Create an active response script in Wazuh to restore files from backups when unauthorized changes are detected.
5. Anomaly Detection and Insider Threat Prevention
5.1 Install Osquery
sudo apt-get install -y osquery
5.2 Configure Osquery
Edit /etc/osquery/osquery.conf:
{
  "options": {
    "config_plugin": "filesystem",
    "logger_plugin": "filesystem",
    "logger_path": "/var/log/osquery",
    "enable_monitor": "true",
    "monitor_log_file": "/var/log/osquery/osqueryd.monitoring.log"
  },
  "schedule": {
    "user_changes": {
      "query": "SELECT * FROM users;",
      "interval": 3600
    },
    "login_events": {
      "query": "SELECT * FROM last WHERE tty NOT LIKE 'pts/%';",
      "interval": 300
    }
  }
}
5.3 Integrate with SIEM
Configure Osquery to send logs to your SIEM solution (e.g., Elasticsearch).
Edit /etc/osquery/osquery.conf to set up remote logging:
{
  "options": {
    // Previous options
  },
  "distributed_plugin": "tls",
  "logger_plugin": "tls",
  "tls_hostname": "your.siem.server:port",
  "tls_server_certs": "/path/to/certs.pem",
  "logger_tls_endpoint": "/api/v1/osquery/log",
  "config_tls_endpoint": "/api/v1/osquery/config",
  "enroll_tls_endpoint": "/api/v1/osquery/enroll",
  "enroll_secret_path": "/var/osquery/enroll_secret"
}
5.4 AI-Based Anomaly Detection
Set up machine learning models in your SIEM to analyze user behavior patterns and detect anomalies.
6. System Hardening and Baseline Management
6.1 Install OpenSCAP
sudo apt-get install -y libopenscap8
sudo apt-get install -y scap-workbench
6.2 Perform a SCAP Audit
Download the SCAP Security Guide:
sudo apt-get install -y ssg-base ssg-debderived
Run a scan against the CIS benchmark:
oscap xccdf eval --profile xccdf_org.ssgproject.content_profile_cis /usr/share/openscap/scap-yum-*.xml
6.3 Automate Remediation
Generate a remediation script:
oscap xccdf generate fix --profile xccdf_org.ssgproject.content_profile_cis /usr/share/openscap/scap-yum-*.xml > remediate.sh
Run the remediation script:
sudo bash remediate.sh
Set up a cron job to run the audit and remediation periodically:
sudo crontab -e
Add the following line to run daily at midnight:
0 0 * * * /usr/bin/oscap xccdf eval --profile xccdf_org.ssgproject.content_profile_cis /usr/share/openscap/scap-yum-*.xml && /usr/bin/oscap xccdf generate fix --profile xccdf_org.ssgproject.content_profile_cis /usr/share/openscap/scap-yum-*.xml | bash
End-to-End Testing
1. Simulate an Attack
Use Metasploit to simulate a privilege escalation attack.
1.1 Install Metasploit on a Test Machine
curl https://raw.githubusercontent.com/rapid7/metasploit-framework/master/scripts/msfupdate | sudo bash
1.2 Launch an Attack Simulation
Use a known exploit module to attempt privilege escalation on your server.
Monitor how Falco detects the attack and how Ansible triggers self-healing.
2. Validate Firewall Automation
Run a port scan using nmap from an external machine:
nmap -sS -p 1-65535 your.server.ip
Check if CrowdSec detects the scan and blocks the IP.
3. Verify File Integrity Monitoring
Modify a monitored file:
sudo echo "malicious code" >> /etc/passwd
Observe how Wazuh detects the change and restores the file.
4. Test Anomaly Detection
Perform abnormal user activities, like logging in at unusual hours or accessing restricted directories.
Check if Osquery and your SIEM flag these activities.
Final Notes
Security Updates: Regularly update all tools to their latest versions to ensure you have the latest security patches.
Monitoring: Continuously monitor logs and alerts to fine-tune AI models and reduce false positives.
Documentation: Keep detailed documentation of your configurations and custom scripts for maintenance and auditing purposes.
Conclusion
AI is the game-changer that transforms Linux systems from static entities into intelligent, self-healing, and secure environments. By integrating AI into DevSecOps workflows, you not only enhance real-time threat detection but also automate remediation and system hardening processes, resulting in minimal downtime and maximum security. The future of Linux security is AI-powered, and it’s here now.
Let’s revolutionize Linux security with AI !!
Stay tuned for PART 2 of my Linux Series, where we’ll dive deeper into Vulnerability Management and Compliance Auditing!
Feel free to subscribe my newsletter and follow me on LinkedIn.


